- 1. 禅道介绍
- 1.1 关于禅道项目管理软件
- 1.2 如何获得支持
- 1.3 各版本功能差异
- 1.4 关注我们
- 2. 安装禅道
- 2.1. 环境搭建
- 2.1.1 搭建Ubuntu环境安装禅道
- 2.1.2 搭建Centos环境安装禅道
- 2.1.3 安装PHP的ioncube扩展
- 2.2. 安装禅道新版本
- 2.2.1 选择适合您的安装方法
- 2.2.2 新版本禅道的安装升级
- 2.2.3 Windows一键安装包(新版)
- 2.2.4 Windows一键安装包(旧版)
- 2.2.5 linux用一键安装包(推荐)
- 2.2.6 使用源码包安装(各系统通用)
- 2.2.7 使用源码包安装(MAC系统)
- 2.2.8 基于禅道当前的一键安装包(Windows和Linux)如何源码安装旗舰版禅道
- 2.2.9 渠成命令行安装禅道
- 2.2.10 Docker和Kubernetes方式部署禅道
- 2.3. 安装12开源版
- 2.3.1 选择适合您的安装方法
- 2.3.2 使用云禅道在线项目管理服务
- 2.3.3 (推荐)windows用一键安装包安装
- 2.3.4 (推荐)Linux用一键安装包
- 2.3.5 linux下用lampp集成包安装
- 2.3.6 使用源码包安装(MAC系统)
- 2.3.7 MAC下用XAMPP安装禅道
- 2.3.8 MAC下用XAMPP-VM安装禅道
- 2.3.9 使用源码包安装(各系统通用)
- 2.3.10 宝塔面板安装禅道
- 2.3.11 华芸NAS在线安装
- 2.3.12 Centos7.4系统下安装httpd,mariadb,php7.2环境运行禅道
- 2.3.13 Centos8系统下安装httpd,mariadb,php7.2环境运行禅道
- 2.3.14 安装ioncube扩展
- 2.3.15 安装swoole扩展
- 2.3.16 Docker方式部署禅道
- 2.4. 安装12企业版
- 2.4.1 禅道企业版安装包安装方式(各系统通用)
- 2.4.2 (推荐)Windows一键安装包安装
- 2.4.3 (推荐)Linux一键安装包安装
- 2.4.4 centos 7.x 源码安装禅道企业版
- 2.5 安装PHP的LDAP扩展
- 2.6 在线安装云禅道
- 2.1. 环境搭建
- 3. 升级禅道
- 3.1. 升级12开源版
- 3.1.1 选择和自己环境对应的升级方式
- 3.1.2 通过源代码方式升级(通用)
- 3.1.3 windows一键安装包的升级
- 3.1.4 linux一键安装包升级
- 3.2. 升级12企业版
- 3.3. 升级禅道新版本
- 3.3.1 选择和自己环境对应的升级方式
- 3.3.2 通过源代码方式升级(通用)
- 3.3.3 windows一键安装包的升级
- 3.3.4 linux一键安装包升级
- 3.3.5 docker安装禅道-升级禅道
- 3.3.6 旧版Docker镜像升级说明
- 3.3.7 通过Roadrunner管理定时任务
- 3.4 如何安装ioncube扩展
- 3.1. 升级12开源版
- 4. 维护配置
- 4.1. 维护禅道
- 4.1.1 初始化管理脚本
- 4.1.2 备份禅道
- 4.1.3 恢复删除的资源
- 4.1.4 如何更新燃尽图
- 4.1.5 一键安装包如何实现mysql异机连接
- 4.1.6 linux一键安装包配置https
- 4.2. 配置禅道
- 4.2.1 设置是否允许匿名访问
- 4.2.2 如何配置email发信
- 4.2.3 如何成为超级管理员
- 4.2.4 配置禅道系统为静态访问
- 4.2.5 去掉禅道访问地址中的zentao
- 4.2.6 linux一键安装包去掉禅道访问地址中的zentao
- 4.2.7 集成禅道和svn
- 4.2.8 集成禅道和git
- 4.2.9 在第三方应用中集成禅道
- 4.2.10 第三方应用配置免密登录禅道
- 4.2.11 第三方应用集成禅道客户端进行消息通知
- 4.2.12 集成webhook
- 4.2.13 集成ZDOO
- 4.2.14 客户端集成
- 4.2.15 禅道的翻译功能
- 4.2.16 浏览器通知的设置
- 4.2.17 集成钉钉工作消息通知
- 4.2.18 集成企业微信应用消息通知
- 4.2.19 集成飞书群机器人
- 4.2.20 集成飞书消息通知
- 4.2.21 集成版本库、集成Jenkins,并进行构建
- 4.2.22 解决一键安装包密码口令弱的问题
- 4.3. 性能优化
- 4.1. 维护禅道
- 5. 快速入门
- 5.1. 12版本快速入门
- 5.1.1 禅道使用的基本流程和产品、研发、测试之间的三权分立
- 5.1.2 禅道的新手教程
- 5.1.3 创建第一个产品
- 5.1.4 添加第一个需求
- 5.1.5 开始第一个项目
- 5.1.6 确定项目要完成的需求列表
- 5.1.7 为需求分解任务
- 5.1.8 提交bug
- 5.1.9 禅道的自定义功能
- 5.1.10 文档管理
- 5.1.11 如何排查产品、项目是否有访问权限
- 5.1.12 年度总结,工作内容统计一览表说明
- 5.2. 12版创建分组和用户
- 5.2.1 建立部门结构
- 5.2.2 添加一个用户帐号
- 5.2.3 批量维护帐号
- 5.2.4 设置分组,建立权限体系
- 5.3. 12版本最简使用
- 5.3.1 使用禅道来进行项目任务管理
- 5.3.2 只使用禅道来做bug管理
- 5.3.3 只使用禅道来进行产品管理
- 5.3.4 个人使用禅道来做事务跟踪管理
- 5.4. 12版本基本使用
- 5.4.1 敏捷开发及scrum简介
- 5.4.2 禅道和scrum的对应关系
- 5.4.3 视频教程:第一个演示项目
- 5.4.4 维护联系人
- 5.4.5 导入excel、csv参考文档
- 5.4.6 工作方式的切换
- 5.4.7 操作获取积分功能
- 5.4.8 自定义必填项功能
- 5.5. 12版本进阶使用
- 5.5.1. 使用流程
- 5.5.1.1 禅道使用流程图解
- 5.5.2. 个人管理
- 5.5.2.1 使用待办进行个人事务管理
- 5.5.2.2 关注需要自己处理的任务、需求、bug
- 5.5.2.3 通过我的档案查看或者修改个人信息
- 5.5.2.4 视频教程:禅道使用之个人篇
- 5.5.3. 产品经理篇
- 5.5.3.1 维护产品
- 5.5.3.2 维护产品线
- 5.5.3.3 创建和评审需求
- 5.5.3.4 变更和评审需求
- 5.5.3.5 需求的状态和研发阶段
- 5.5.3.6 需求的注意事项
- 5.5.3.7 维护产品模块
- 5.5.3.8 建立发布计划
- 5.5.3.9 建立发布
- 5.5.3.10 路线图
- 5.5.3.11 文档管理
- 5.5.3.12 主持产品会议
- 5.5.3.13 参与项目管理、演示和总结
- 5.5.3.14 需求的基本统计报表
- 5.5.3.15 视频教程:禅道使用之产品经理篇
- 5.5.4. 项目经理篇
- 5.5.4.1 建立项目
- 5.5.4.2 组建项目团队
- 5.5.4.3 确定项目要完成的需求列表
- 5.5.4.4 组织进行任务分解
- 5.5.4.5 召开每天的站立会议
- 5.5.4.6 通过燃尽图了解项目的进展
- 5.5.4.7 通过各种列表的各种功能了解项目进展
- 5.5.4.8 召开演示会议和总结会议
- 5.5.4.9 项目任务基本的报表统计
- 5.5.4.10 视频教程:禅道使用之项目经理篇
- 5.5.5. 开发团队篇
- 5.5.5.1 参加项目计划会议,分解任务
- 5.5.5.2 领取任务,并每天更新任务
- 5.5.5.3 通过看板和树状图查看任务
- 5.5.5.4 创建版本
- 5.5.5.5 申请测试
- 5.5.5.6 解决bug
- 5.5.5.7 文档管理
- 5.5.5.8 确认bug
- 5.5.5.9 视频教程:禅道使用之开发团队篇
- 5.5.6. 测试团队篇
- 5.5.6.1 维护bug视图模块
- 5.5.6.2 提交bug
- 5.5.6.3 验证bug,关闭
- 5.5.6.4 激活bug
- 5.5.6.5 找到自己需要的bug
- 5.5.6.6 维护测试用例视图
- 5.5.6.7 创建测试用例
- 5.5.6.8 测试套件、报告和公共用例库的维护
- 5.5.6.9 管理测试版本
- 5.5.6.10 执行用例,提交Bug
- 5.5.6.11 查看报表统计
- 5.5.6.12 视频教程:禅道使用之测试团队篇
- 5.5.1. 使用流程
- 5.6. 12版本企业版使用
- 5.6.1 开源版功能
- 5.6.2 添加用户和权限维护
- 5.6.3 甘特图功能简介
- 5.6.4 工作日志管理功能简介
- 5.6.5 代码库(SVN GIT)及代码评审
- 5.6.6 日历功能简介
- 5.6.7 Excel导入导出功能简介
- 5.6.8 短信通知功能简介
- 5.6.9 运维管理
- 5.6.10 导出为Word功能简介
- 5.6.11 水晶报表(自定义报表)功能简介
- 5.6.12 LDAP用户验证功能简介
- 5.6.13 反馈管理
- 5.6.14 统计视图功能简介
- 5.6.15 文档管理
- 5.6.16 报表导出功能简介
- 5.6.17. 办公管理
- 5.6.18. 工作流
- 5.6.18.1 工作流内置流程
- 5.6.18.2 工作流功能简介
- 5.6.18.3 自定义内置工作流
- 5.6.18.4 新增工作流示例
- 5.6.18.5 工作流 JS、CSS 使用说明
- 5.6.19 视频及PPT资料
- 5.7. 新版本快速入门
- 5.7.1 15后新版本禅道的新增功能
- 5.7.2 15后新版本禅道的界面变化
- 5.7.3 15后新版本禅道的最简使用
- 5.1. 12版本快速入门
- 6. 按照角色使用
- 6.1. 管理员
- 6.1.1 维护组织部门
- 6.1.2 维护用户
- 6.1.3 维护权限
- 6.1.4. 办公管理(企业版)
- 6.1.5. 工作流(企业版)
- 6.1.5.1 内置工作流(企业版)
- 6.1.6 短信通知(企业版)
- 6.1.7. 运维管理(企业版)
- 6.1.7.1 ZAgent的使用(企业版)
- 6.1.7.2 虚拟机的使用
- 6.1.8 LDAP用户验证(企业版)
- 6.2. 项目集负责人
- 6.3. 产品经理
- 6.4. 项目经理
- 6.4.1 维护项目和执行
- 6.4.2 维护团队
- 6.4.3 关联需求
- 6.4.4 分解任务
- 6.4.5 跟踪进度
- 6.4.6 甘特图(企业版)
- 6.4.7 代码评审(企业版)
- 6.4.8 瀑布项目的使用
- 6.4.9. 瀑布项目特有功能(旗舰版)
- 6.4.9.1 维护项目的计划、阶段(旗舰版)
- 6.4.9.2 项目设计、矩阵(旗舰版)
- 6.4.9.3 项目评审、配置(旗舰版)
- 6.4.9.4 项目报告、挣值管理(旗舰版)
- 6.4.9.5 项目调研、估算(旗舰版)
- 6.4.9.6 项目问题、风险、机会(旗舰版)
- 6.4.9.7 项目过程、度量、QA(旗舰版)
- 6.4.9.8 项目培训、会议(旗舰版)
- 6.4.10 看板项目的使用
- 6.4.11 融合敏捷项目
- 6.4.12 融合瀑布项目
- 6.4.13 文档管理(企业版)
- 6.4.14 Excel 导入导出(企业版)
- 6.4.15 Word 导出(企业版)
- 6.4.16 统计(企业版)
- 6.4.17 报表导出(企业版)
- 6.4.18 资产库管理
- 6.5. 研发人员
- 6.5.1 参加产品计划会议,分解任务
- 6.5.2 领取任务,并每天更新任务
- 6.5.3 创建版本,提交测试
- 6.5.4 确认Bug,解决Bug
- 6.5.5 执行的综合、需求、Bug、任务看板
- 6.6. 测试人员
- 6.1. 管理员
- 7. 功能介绍
- 7.1. 新增概念
- 7.1.1 项目集(Program)
- 7.1.2 项目(Project)
- 7.1.3 产品(Product)
- 7.1.4 管理模型
- 7.2. 地盘
- 7.3. 项目集
- 7.4. 产品
- 7.5. 项目
- 7.5.1. 项目通用功能
- 7.5.1.1 项目的基本设置
- 7.5.1.2 维护项目的执行
- 7.5.1.3 维护项目的需求
- 7.5.1.4 维护项目的Bug、用例、测试单、测试报告
- 7.5.1.5 维护项目的文档
- 7.5.1.6 维护项目的版本、发布
- 7.5.2 看板项目
- 7.5.3. 瀑布项目特有功能(企业版与旗舰版)
- 7.5.3.1 维护项目的计划、阶段
- 7.5.3.2 项目设计、矩阵(矩阵为企业版)
- 7.5.3.3 项目评审、配置(旗舰版)
- 7.5.3.4 项目报告、挣值管理(旗舰版)
- 7.5.3.5 项目调研、估算(旗舰版)
- 7.5.3.6 项目问题、风险、机会(旗舰版)
- 7.5.3.7 项目过程、度量、QA(旗舰版)
- 7.5.3.8 项目培训、会议(旗舰版)
- 7.5.4 融合敏捷项目
- 7.5.5 融合瀑布项目
- 7.5.1. 项目通用功能
- 7.6. 执行
- 7.6.1 参加产品计划会议,分解任务
- 7.6.2 领取任务,并每天更新任务
- 7.6.3 创建版本,提交测试
- 7.6.4 确认Bug,解决Bug
- 7.6.5 执行的综合、需求、Bug、任务看板
- 7.7. 测试
- 7.8. 自动化测试
- 7.9 DevOps(新平台版)
- 7.10. DevOps(旧版)
- 7.10.1. DevOps 功能
- 7.10.1.1 Git/SVN版本库管理和查看代码
- 7.10.1.2. 集成GitLab
- 7.10.1.2.1 绑定用户,关联issue,进行构建
- 7.10.1.2.2 合并请求
- 7.10.1.2.3 禅道中GitLab的权限
- 7.10.1.3 集成Jenkins,进行构建
- 7.10.1.4 集成SonarQube
- 7.10.1. DevOps 功能
- 7.11. 看板
- 7.11.1 通用看板功能
- 7.12. 资产库(旗舰版)
- 7.12.1 资产库管理(旗舰版)
- 7.13. 文档
- 7.14. BI
- 7.14.1 维度(企业版8.4+)
- 7.14.2 大屏(企业版8.4+)
- 7.14.3. 大屏设计器
- 7.14.3.1 大屏设计器界面布局
- 7.14.3.2 大屏设计器引用图表
- 7.14.3.3 大屏设计器引用透视表
- 7.14.4 透视表(企业版8.4+)
- 7.14.5 图表(企业版8.4+)
- 7.14.6 数据表(企业版8.4+)
- 7.14.7. 度量项
- 7.14.7.1 查看度量项
- 7.14.7.2 度量项编码开发操作手册
- 7.14.8 统计(旧版)
- 7.14.9 报表导出(旧版)
- 7.14.10 自定义报表(旧版)
- 7.14.11 可视化(旧版)
- 7.15. AI
- 7.15.1 AI小程序简介
- 7.15.2 创建与设计AI小程序(企业版)
- 7.15.3 调试AI小程序(企业版)
- 7.15.4 发布与禁用小程序
- 7.15.5 前台小程序的应用
- 7.15.6 AI小程序的导入导出
- 7.15.7 管理AI小程序权限
- 7.16. 组织
- 7.16.1 团队成员和工作信息
- 7.16.2 人力资源日历(需安装插件)
- 7.16.3 组织动态
- 7.16.4 公司信息
- 7.17. 办公(企业版)
- 7.18. 反馈(企业版)
- 7.19. 学堂(企业版)
- 7.19.1 学堂的课程和后台(企业版)
- 7.19.2 实践库(企业版)
- 7.20. 工作流(企业版)
- 7.20.1 内置工作流(企业版)
- 7.21. 后台设置
- 7.21.1 首页
- 7.21.2. 系统设置
- 7.21.2.1 模式、备份、回收站
- 7.21.2.2 聊天
- 7.21.2.3 授权、安全、定时、时区、重建索引、表引擎
- 7.21.2.4 LDAP(企业版)
- 7.21.3 功能开关(超级管理员)
- 7.21.4. 人员管理
- 7.21.5 模型配置
- 7.21.6. 功能配置
- 7.21.6.1 地盘、产品、执行、测试、看板、文档、反馈
- 7.21.6.2 审批、度量、用户、会议室
- 7.21.6.3 审批流程(旗舰版)
- 7.21.7 文档模板(旗舰版)
- 7.21.8. 通知设置
- 7.21.9 插件管理
- 7.21.10 二次开发
- 7.21.11 数据导入(管理员)
- 7.21.12. 权限维护和控制
- 7.21.12.1 项目集的权限维护和访问控制
- 7.21.12.2 产品的权限维护和访问控制
- 7.21.12.3 项目的权限维护和访问控制
- 7.21.12.4 执行的权限维护和访问控制
- 7.21.12.5 项目和执行的访问控制和数据关系
- 7.21.13. AI配置
- 7.21.14. DevOps设置
- 7.22. 客户端增强版会议
- 7.22.1. 音视频会议配置
- 7.22.1.1 安装音视频服务端
- 7.22.1.2 安装SRS音视频服务端
- 7.22.1.3 开启和配置音视频功能
- 7.22.2. 发起会议
- 7.22.2.1 一对一会话中发起音视频会议
- 7.22.2.2 群组会话中发起音视频会议
- 7.22.2.3 独立发起音视频会议入口
- 7.22.3. 加入会议
- 7.22.3.1 分享音视频会议到会话
- 7.22.3.2 通过会议的ID加入会议
- 7.22.4. 预约会议
- 7.22.4.1 预约会议
- 7.22.5. 会议应用
- 7.22.5.1 音视频会议应用
- 7.22.1. 音视频会议配置
- 7.1. 新增概念
- 8. 其他相关
centos 7.x 源码安装禅道企业版 分享链接
一、运行环境说明
运行环境推荐使用 Apache + PHP(7.0/7.1/7.2版本) + MySQL(5.5/5.6版本)/mariadb组合 ,Nginx其次。
禅道需要使用pdo, pdo_mysql, json, filter, openssl, mbstring, zlib, curl, gd, iconv,zip,xml,ldap,bcmath这几个模块,需要确保PHP环境有加载这几个模块。
运行环境推荐使用 Apache + PHP(7.0/7.1/7.2版本) + MySQL(5.5/5.6版本)/mariadb组合 ,Nginx其次。
二、安装httpd
1、 检查下是否安装了httpd.
rpm -qa httpd
如图:执行结果是没有安装过httpd,如果有安装httpd,可以直接进行使用,无需安装。

2、如果没有安装httpd 我们使用命令安装下httpd.
sudo yum install httpd
3、设置httpd开机启动/关闭
systemctl enable httpd.service #开机启动
systemctl disable httpd.service #开机不启动
systemctl status httpd.service #检查httpd状态
4、httpd服务启动/停止/重启命令
systemctl start httpd.service //启动httpd服务
systemctl stop httpd.service //停止httpd服务
systemctl restart httpd.service //重启httpd服务
5、关闭selinux和设置防火墙打开80端口(httpd的端口有修改的话,防火墙可以打开修改后的端口)。
关闭selinux
setenforce 0 //临时关闭selinux,服务器重启后需要重新执行这个命令防火墙打开端口
防火墙打开80端口
firewall-cmd --zone=public --add-port=80/tcp --permanent    (--permanent永久生效,没有此参数重启后失效)
重新载入
firewall-cmd --reload
查看
firewall-cmd --zone=public --query-port=80/tcp
删除
firewall-cmd --zone=public --remove-port=80/tcp --permanent
启动关闭防火墙相关命令(如果已经使用上面命令打开防火墙端口,这一步可以忽略)
systemctl start firewalld.service #启动一个服务
systemctl stop firewalld.service #关闭一个服务
systemctl restart firewalld.service #重启一个服务
systemctl status firewalld.service #显示一个服务的状态
systemctl enable firewalld.service #在开机时启用一个服务
systemctl disable firewalld.service #在开机时禁用一个服务
systemctl is-enabled firewalld.service #查看服务是否开机启动
systemctl list-unit-files|grep enabled #查看已启动的服务列表
systemctl --failed #查看启动失败的服务列表
6、验证httpd是否安装成功,浏览器访问http://ip:端口,结果如下
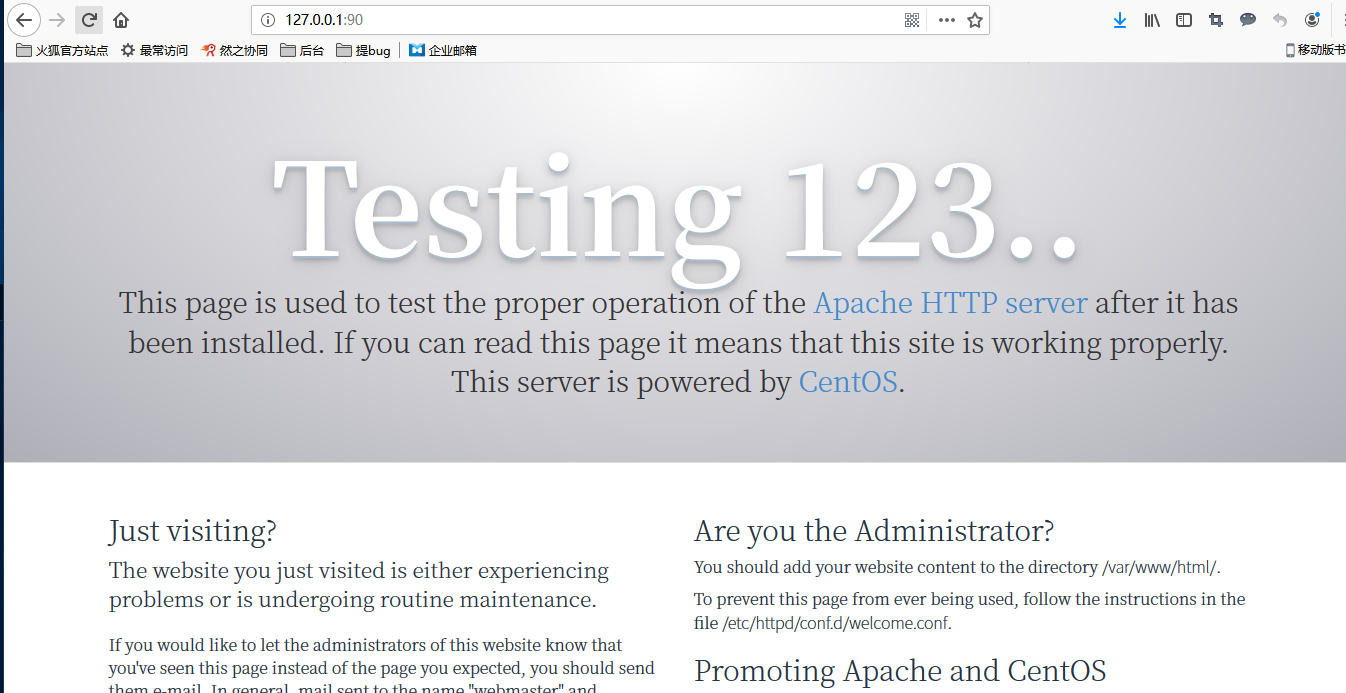
7、如上图所示,httpd安装成功.
三、安装php7.2
rpm -Uvh https://mirror.webtatic.com/yum/el7/epel-release.rpm
rpm -Uvh https://mirror.webtatic.com/yum/el7/webtatic-release.rpm
2、在源文件中搜索php7.2
yum search php72w
3、安装php7.2以及扩展
yum install php72w php72w-devel php72w-gd php72w-pdo php72w-mysql php72w-mbstring php72w-bcmath php72w-ldap php72w-gd php72w-json php72w-xml php72w-zip
验证php是否安装成功,执行命令创建index.php文件
vi /var/www/html/index.php
插入以下内容:
<?php
phpinfo();
浏览器访问http://ip:端口/index.php,结果如下
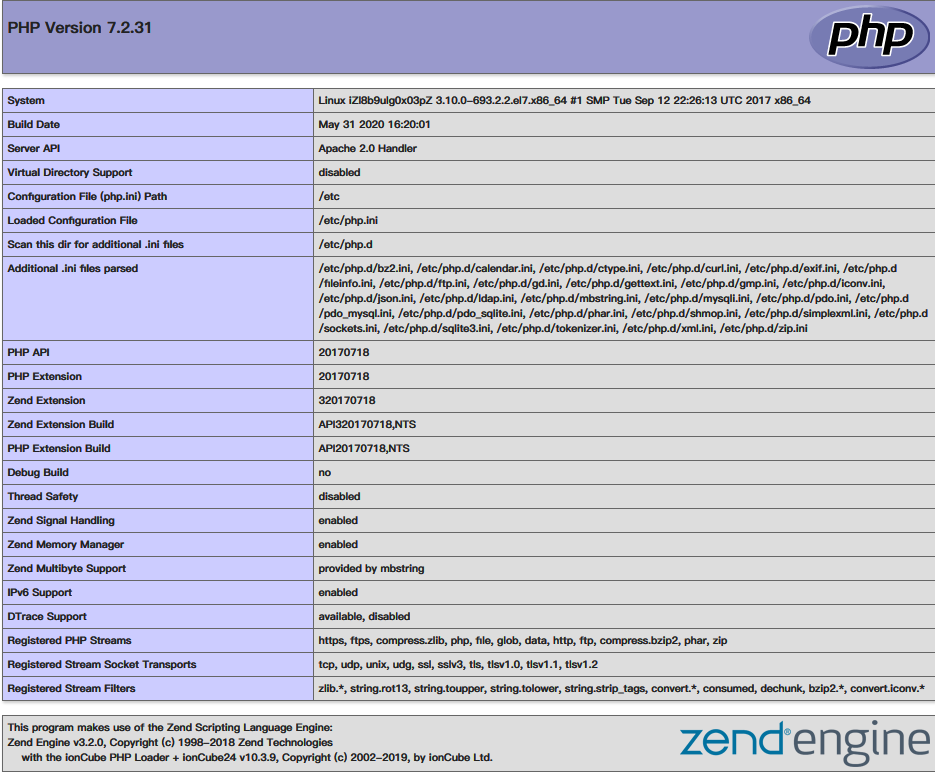
4、如图,php7.2安装成功,删除index.php
四、安装mariaDB
Centos 7 之后已经使用mariaDB 替换Mysql
Mysql 已经不在包含在Centos 7源中,而改用里MariaDB.
1、使用rpm -qa | grep mariadb搜索 MariaDB 现有的包
rpm -qa | grep mariadb

2、开始安装,创建MariaDB.repo文件
vi /etc/yum.repos.d/MariaDB.repo插入以下内容:
# MariaDB 10.2.4 CentOS repository list - created 2017-05-05 16:13 UTC
# http://downloads.mariadb.org/mariadb/repositories/
[mariadb]
name = MariaDB
baseurl = http://yum.mariadb.org/10.2.4/centos7-amd64
gpgkey=https://yum.mariadb.org/RPM-GPG-KEY-MariaDB
gpgcheck=1
系统及版本选择:
https://downloads.mariadb.org/mariadb/repositories/#mirror=tuna
3、执行安装命令
yum -y install MariaDB-server MariaDB-client
4、设置mariaDB服务开机启动
systemctl enable mariadb #设置开机启动
systemctl disable mariadb #设置开机不启动
systemctl status mariadb #检查mariadb状态
5、启动mariaDB 服务
systemctl start mariadb #启动服务
systemctl restart mariadb #重新启动
systemctl stop mariadb.service #停止MariaDB
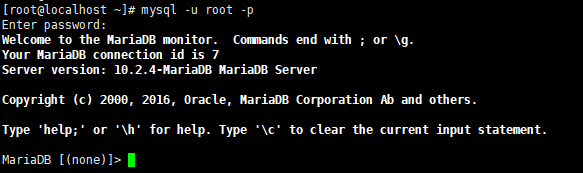
6、登录到数据库
用mysql -uroot命令登录到MariaDB,此时root账户的密码为空。
7、进行MariaDB的相关简单配置,使用mysql_secure_installation命令进行配置。
首先是设置密码,会提示先输入密码
Enter current password for root (enter for none):<–初次运行直接回车
设置密码
Set root password? [Y/n] <– 是否设置root用户密码,输入y并回车或直接回车
New password: <– 设置root用户的密码
Re-enter new password: <– 再输入一次你设置的密码
其他配置
Remove anonymous users? [Y/n] <– 是否删除匿名用户,回车
Disallow root login remotely? [Y/n] <–是否禁止root远程登录,回车,
Remove test database and access to it? [Y/n] <– 是否删除test数据库,回车
Reload privilege tables now? [Y/n] <– 是否重新加载权限表,回车
初始化MariaDB完成,接下来测试登录
五、安装禅道企业版
1、可以参考手册安装下ioncube解密扩展 :
https://www.zentao.net/book/zentaoprohelp/194.html
2、在禅道官网下载企业版php7.2对应的安装包(可以联系禅道商务同事要一下安装包)
https://www.zentao.net/download.html 禅道官网下载地址
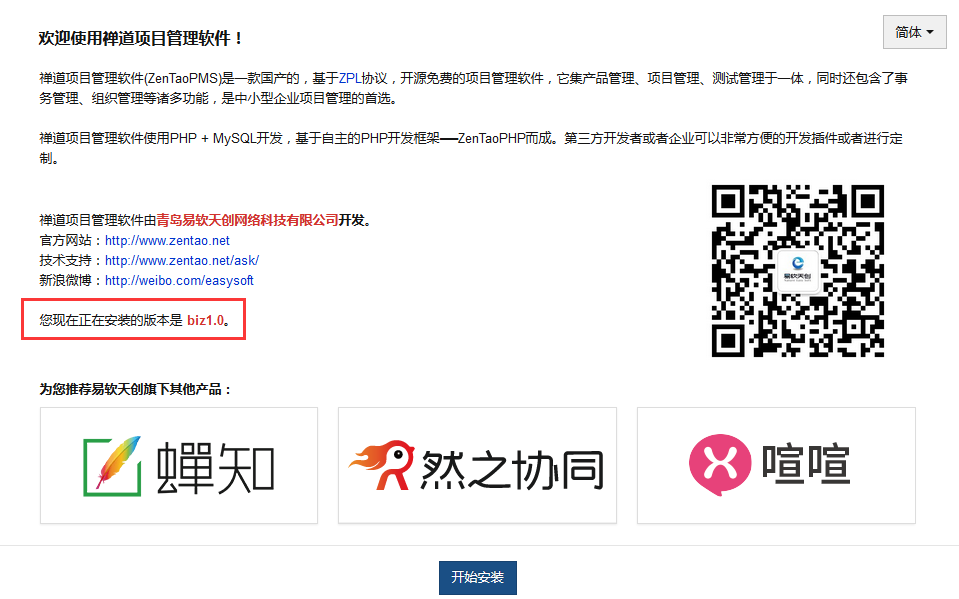
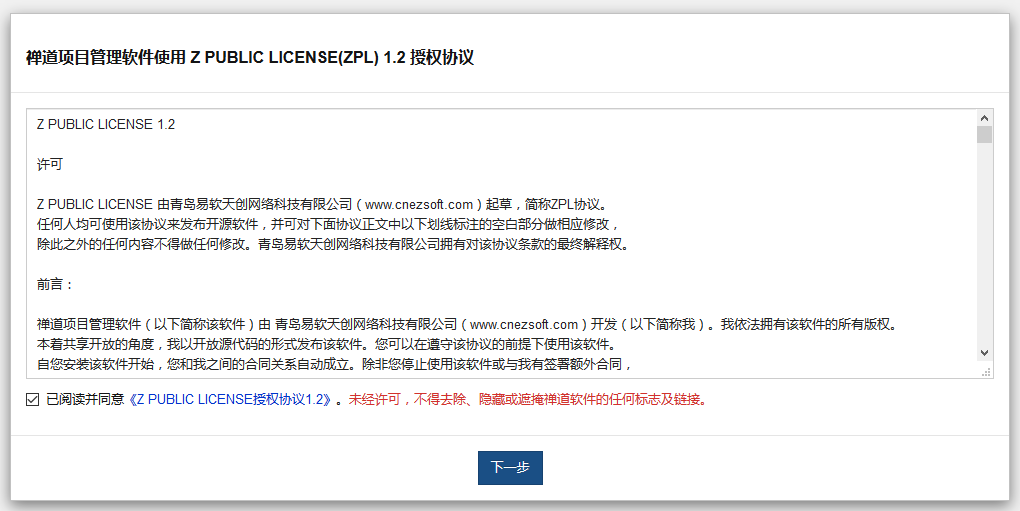
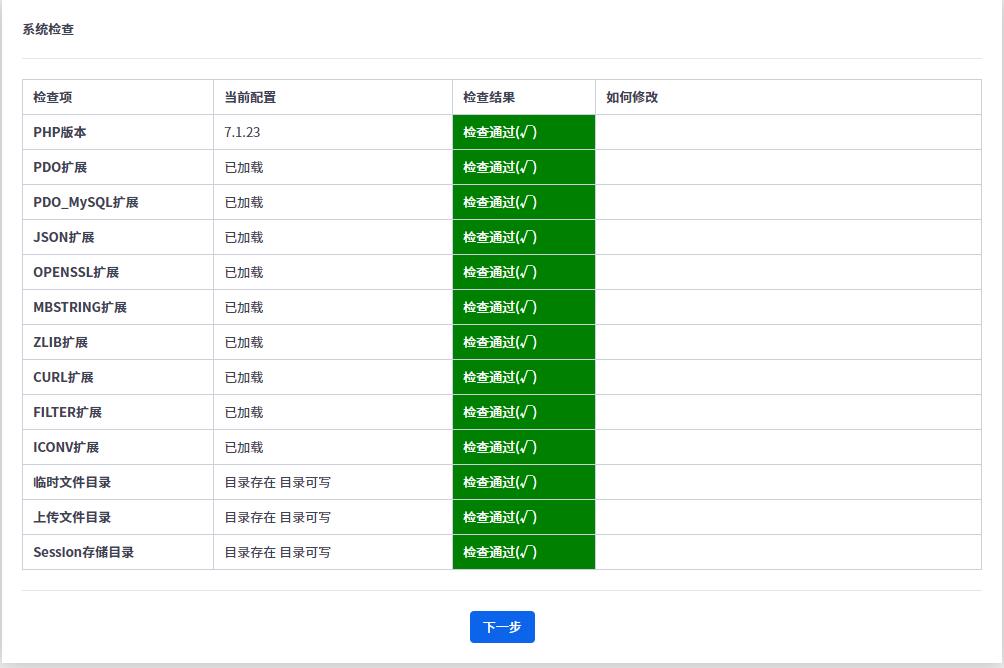
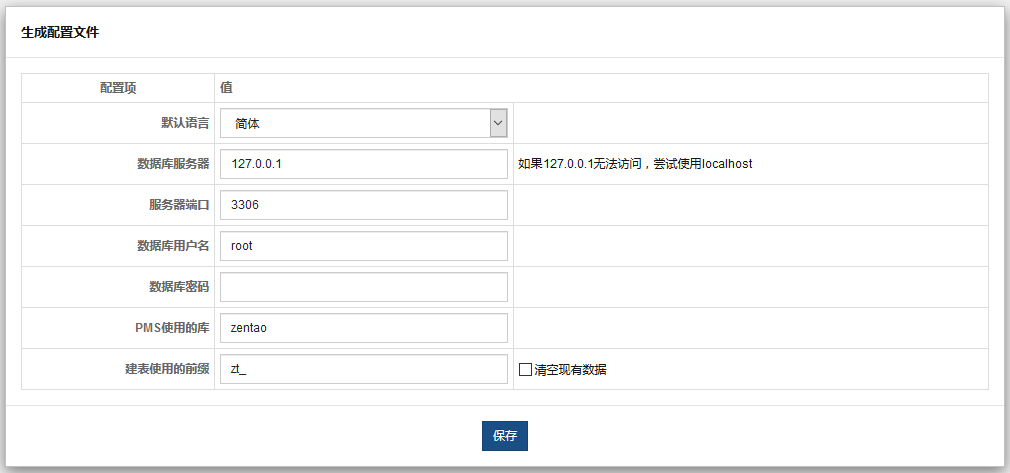
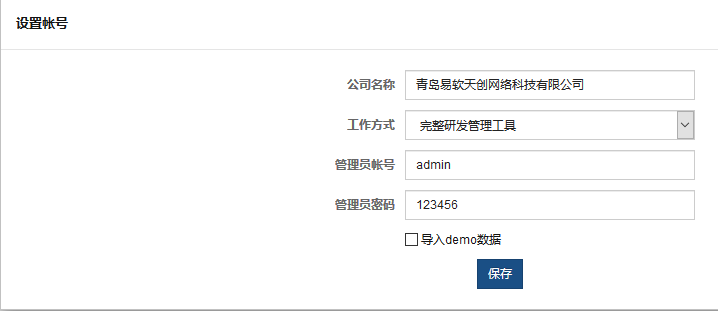
3、下载安装包后放到服务器/var/www/html目录下,解压安装包的到zentaopms目录。浏览器访问http://ip:端口/zentaopms/www/install.php 进行安装禅道。

4、设置虚拟主机
vi /etc/httpd/conf/httpd.conf检查是否加载conf配置,没有的话,可以手动增加一下
IncludeOptional conf.d/*.conf
另外,把 Require all denied默认拒绝访问设置为允许访问: Require all granted,方便测试。
<Directory />
AllowOverride none
#  Require all denied
    Require all granted
</Directory>
新增虚拟主机配置文件
vi /etc/httpd/conf.d/zentao.conf插入内容:
<VirtualHost *:80>
ServerName localhost:80
 #换成你具体的域名。
DocumentRoot "/var/www/html/zentaopms/www/"
#换成具体的zentaopms下面的www目录。
<Directory />
Options FollowSymLinks
AllowOverride All
</Directory>
</VirtualHost>
重启httpd
systemctl restart httpd.service
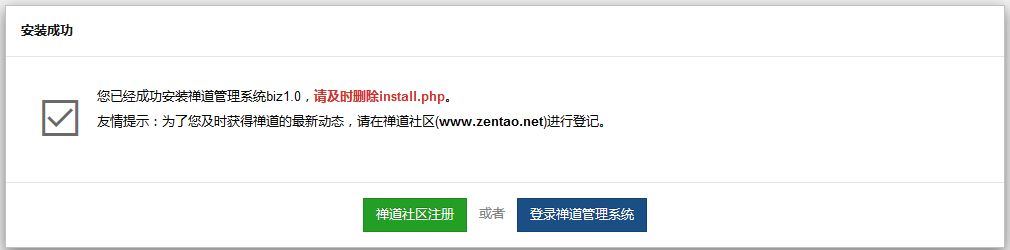
5、使用http://ip:端口 ,访问禅道.
6、联系禅道商务同事索要授权文件,超级管理员登录禅道后台- 系统 - 授权信息-替换授权(老版本位置是在 后台 -授权信息-替换授权) 上传这个zip文件。